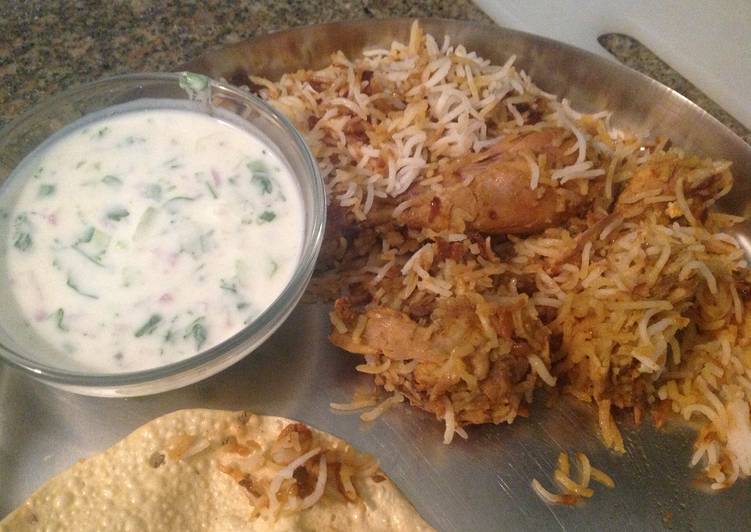
Chicken Dum Biryani with Raita - Household warmth and closeness may be obtained in easy approaches. A single of them is cooking and serving food for the loved ones. As a housewife, needless to say you do not would like to miss a meal together proper? Cuisine may also be the important to a pleased family members, lots of really feel homesick due to the fact their cooking has been found elsewhere.
So for those of you who prefer to cook and like it or not you have to supply meals for the family members, certainly you also don't want the exact same dishes, suitable? You could cook with new and easy variants. For the reason that now you may very easily obtain recipes with out possessing to bother. Like the following Chicken Dum Biryani with Raita which you can imitate to be presented for your beloved loved ones.
Chicken Dum Biryani with Raita is one of the most popular of current trending foods on earth. It is easy, it's quick, it tastes yummy. It's appreciated by millions daily. They are nice and they look fantastic. Chicken Dum Biryani with Raita is something that I have loved my whole life.
To begin with this particular recipe, we have to first prepare a few components. You can cook chicken dum biryani with raita using 36 ingredients and 23 steps. Here is how you cook that.
Composition needed to serve Chicken Dum Biryani with Raita:
- 1 kg Whole Chicken cut into pieces (with bone)
- 3 cups Rice Long grain aged
- 1 tbsp Chilli powder
- 1/2 tsp haldi
- 1 tbsp corriander powder
- 1 tbsp lime juice
- 1/2 cup yogurt sour
- Salt
- 3 Onions (medium size)
- 6 tbsps Oil
- salt
- 3 inches Ginger
- 12 cloves Garlic
- 6 red chilli Dry
- 2 red chilli Dry Kashmiri
- 4 green chilli
- 6 Cashew nuts
- 3 inchs Cinnamon
- 10 Cardamom Green
- 2 Cardamom Black
- 1 Star anise
- 10 Black Pepper corns
- 6 Cloves (lavang)
- 1 tsp Nutmeg grated
- 2 Bay leaf
- 1 cup atta
- water
- 1 cup Yogurt
- 2 Green chillies finely chopped
- 1 Onion finely chopped
- 1 Tomato finely chopped
- 1/2 Cucumber chopped
- 1 tbsp Corriander finely chopped
- 1 tsp Jeera powder
- 1/2 cup water
- salt
Directions to serve Chicken Dum Biryani with Raita:
- Heat 6 tbsp veg oil in a thick bottom Kadhai. Finely slice the onions and add them to the oil. Keep the heat on low and let the onions cook. Stir occasionally
- Clean the chicken and squeeze out as much water as possible
- To the chicken add 1 tbsp lime juice + 1 tbsp red chilli powder + 1/2 tsp haldi + 1 tbsp corriander powder + salt and mix well. Make sure the spices do not get stuck in some crevasse of the chicken pieces i.e. it should coat the whole chicken uniformly.
- Add the whole spices and mix
- Add the Ground marinade ingredients to the chicken and mix
- Add 1/2 cup yogurt and mix
- Leave the chicken to marinade for 1 hr
- The onions will take approx 1 hr to become golden brown. You need to become careful after 45 min. If you are not careful towards the end, the onions may burn. After 45 min, add salt and increase the heat and stir continuously until the onions become crisp. Remove immediately and leave to cool. You may remove the onions little earlier if you prefer a less intense caramelised onion taste. I like my onions to be quite browned.
- None
- Empty the oil left behind from frying the onions into the marinating chicken and mix.
- As soon as the onions cool, crush them and add to the marinating chicken and mix. Don't leave the onions out for too long otherwise they will become soggy
- Wash the rice and soak for at least 30 min. You should be gentle while washing long grain rice otherwise the grains will break.
- Add salt to the rice and half cook it i.e. use half water e.g. 3 cups of water for 3 cups of rice. After the water dries out, switch off the heat and keep the rice covered for 10 min.
- Grease the bottom of the large vessel you are going to use for Dum with oil and transfer the marinated chicken into it.
- Overturn the half cooked rice over the chicken in such a way that the rice at the bottom of the vessel comes on top and the rice at the top goes to the bottom. This is necessary because when you half cook the rice, the rice at the bottom will be almost cooked and the rice at the top will be only 1/4th cooked. If you reverse this in the dum, the rice will end up being uniformly cooked.
- If required, use a fork to gently spread the rice to cover the chicken without breaking the rice grains and without mixing the top / bottom too much. Even if the rice is completely covering the chicken, make some cracks in the rice using a fork so that the steam can come through.
- Knead the atta into a stiff dough and line the edge of the vessel with it. Place a cover on the vessel and press it down so that it is sealed all around.
- If the vessel does not have a thick bottom, you will need to place it on a tawa while cooking.
- Place the tawa on one burner to heat. On another burner, place the sealed vessel on high heat. Keep moving the vessel around so that the entire bottom heats uniformly. You need to cook on high heat for 5 min for the steam to develop
- After 5 min, switch off one of the burners. Reduce the heat of the other burner to minimum and place the dum on top of the tawa and let it cook for 35 min.
- In the meantime prepare the raita by finely chopping all ingredients and mix them with some water and salt. Keep in the fridge to cool.
- You will know the biryani is done when you get a heavenly smell out of the dum. Switch off the heat and take the dum off the tawa. If you want to eat later, make a small opening in the aata seal so that the vessel does not collapse under atmospheric pressure on cooling.
- When you are ready to eat, crack open the dum and gorge on fresh steaming biryani with cool raita and crisp papad.
So that is going to wrap it up with this special food chicken dum biryani with raita recipe. Thanks so much for your time. I am confident you can make this at home. There's gonna be interesting food in home recipes coming up. Remember to save this page in your browser, and share it to your family, friends and colleague. Thanks again for reading. Go on get cooking!