🥙🌯Pita Bread🌯🥙 - Household warmth and closeness could be obtained in easy strategies. 1 of them is cooking and serving meals for the loved ones. As a housewife, of course you do not want to miss a meal together correct? Cuisine also can be the crucial to a satisfied household, a lot of feel homesick since their cooking has been discovered elsewhere.
So for those of you who prefer to cook and like it or not you've got to provide meals for the household, naturally you also do not want exactly the same dishes, suitable? You may cook with new and simple variants. Mainly because now it is possible to very easily come across recipes without the need of obtaining to bother. Like the following 🥙🌯Pita Bread🌯🥙 which you'll be able to imitate to become presented to your beloved loved ones.
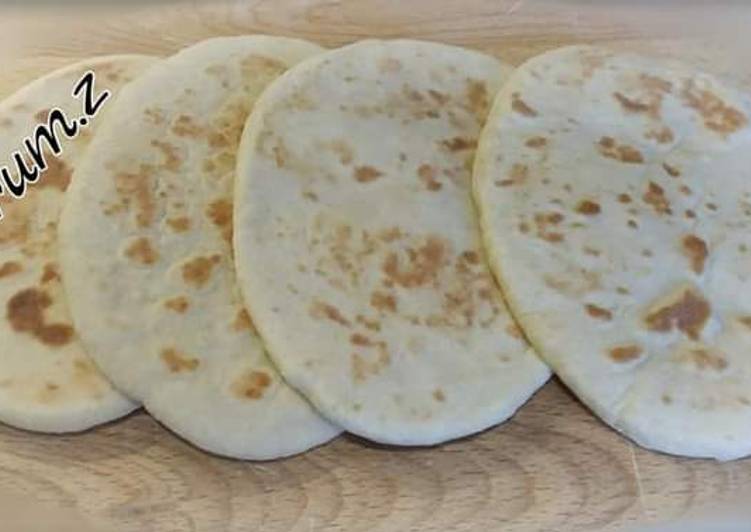
Pita bread will begin to puff up and fill with hot air. Pita bread (also known as Arabic bread and Syrian bread) is a yeast-leavened flatbread common in Mediterranean and Middle Eastern cuisines. It can be made with or without an interior pocket.
🥙🌯Pita Bread🌯🥙 is one of the most popular of recent trending meals on earth. It is enjoyed by millions every day. It is easy, it's quick, it tastes delicious. 🥙🌯Pita Bread🌯🥙 is something which I've loved my entire life. They're nice and they look fantastic.
To begin with this recipe, we have to prepare a few ingredients. You can cook 🥙🌯pita bread🌯🥙 using 5 ingredients and 6 steps. Here is how you cook that.
Ingredients needed to make 🥙🌯Pita Bread🌯🥙:
- 250 g all-purpose flour
- 1 tsp sugar
- 1 tsp yeast
- 2 tsp olive oil
- 1/2 cup (125 ml) lukewarm water (extra for kneading)
You can freeze pita bread for. Pita (/ ˈ p ɪ t ə / or US: / ˈ p iː t ə /) or pitta (British English), is a family of yeast-leavened round flatbreads baked from wheat flour, common in the Mediterranean, Middle East, and neighboring areas. It includes the widely known version with an interior pocket, also known as Arabic bread (Arabic: khubz ʿarabī), Syrian bread, and other names, as well as pocketless versions such as. Pita is best served the same day but can be kept in an airtight container at room temperature for up to one day.
Directions to serve 🥙🌯Pita Bread🌯🥙:
- Add the yeast and sugar into125 ml of lukewarm water, mix and allow to stand for 10 minutes. - In a large bowl add the flour, salt, oil and the yeast mixture. Mix to form a soft dough.
- Knead the dough on a floured surface for at least 5 minutes use electric mixer or by hand. - Place the dough in a lightly-greased bowl, cover and put in a warm place until the dough has doubled in size.
- Turn the dough out onto a floured surface and knock it back. Cut the dough into 4 or 6 equal pieces and roll each piece into a ball cook on a non-stick skillet, pan. - - #OR
- Preheat the oven with a baking tray inside to 210°C (410°F) fan oven / 230°C (450°F) conventional oven. - Roll half of the balls out into ovals about 5mm (¼") thick. Place them on the pre-heated baking tray and bake for 4-5 minutes until they are puffed up and starting to go brown. - Place the cooked pitas on a cooling rack. Roll out and bake the remaining dough balls.
- #Notes: - - You can make the pitas bigger by dividing the dough into 4 pieces instead of 6. - - Eat fresh or freeze them for later!
Variations For extra-flavorful pita, brush one side of each dough round with olive oil and sprinkle with za'atar, a Middle Eastern blend of thyme, sesame seeds, and sumac, before baking. Store-bought pita (like store-bought sandwich bread) is often several days old. Warm, fragrant home-baked pita is obviously superior, and there's a bit of a thrill when the breads puff up in the oven. And once you get the hang of it, it's not difficult. For the best flavor, try to get freshly milled whole-wheat flour.
So that is going to wrap it up with this exceptional food 🥙🌯pita bread🌯🥙 recipe. Thanks so much for reading. I'm confident you will make this at home. There's gonna be interesting food in home recipes coming up. Remember to save this page in your browser, and share it to your loved ones, friends and colleague. Thank you for reading. Go on get cooking!