How To Make Shokupan | Japanese Sandwich Bread - Family warmth and closeness may be obtained in basic techniques. One of them is cooking and serving food for the family. As a housewife, of course you don't desire to miss a meal together proper? Cuisine may also be the important to a happy household, lots of feel homesick since their cooking has been located elsewhere.
So for all those of you who prefer to cook and like it or not you've to supply food for the family, of course you also don't want the identical dishes, appropriate? You'll be able to cook with new and straightforward variants. Due to the fact now you are able to conveniently uncover recipes without the need of possessing to bother. Just like the following How To Make Shokupan | Japanese Sandwich Bread which you can imitate to be presented to your beloved family.
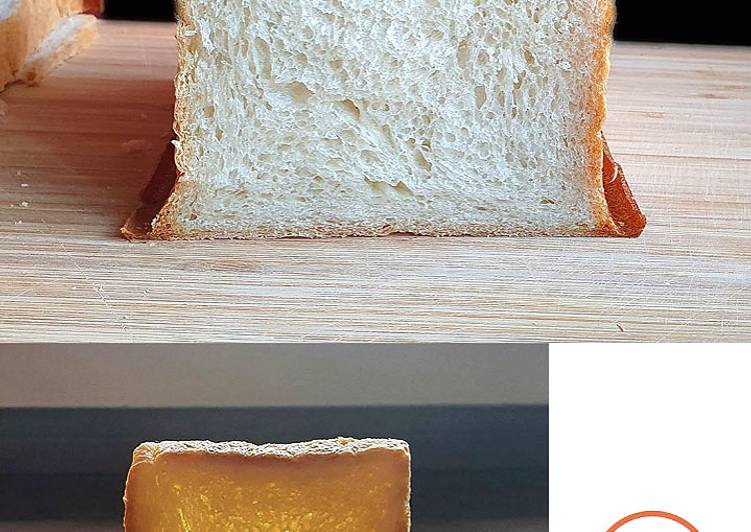
How To Make Shokupan
To begin with this recipe, we have to prepare a few ingredients. You can cook how to make shokupan | japanese sandwich bread using 11 ingredients and 17 steps. Here is how you can achieve it.
Composition needed to serve How To Make Shokupan | Japanese Sandwich Bread:
- Yudane:
- 75 g Bread Flour,
- 125 g Boiling Water,
- Dough:
- 325 g Bread Flour,
- 30 g Demerara Sugar,
- 7 g Sea Salt,
- 6 g Active Instant Dry Yeast,
- 50 g Heavy Whipping Cream,
- 200 g Water,
- Room Temperature Softened Unsalted Butter, 25g + More For Greasing
Two types of Japanese egg sandwich - egg salad sandwich and Japanese rolled omelette sandwich recipe with step by step photos and tips to make it perfect. Japanese Egg Salad Sandwich - Soft sandwich bread filled with a creamy egg salad filling, with a jammy soft boiled egg. Cheesy potato and bacon Scotch Eggs. Depending on how you develop your starter and make your bread, the sour flavor can be quite pronounced or it can be more subtle.
Steps to serve How To Make Shokupan | Japanese Sandwich Bread:
- Prepare the yudane. - - In a shallow bowl, add flour and water. - - The water has to be boiling. - - Stir to combine well.
- It should be a sticky roux. - - Spread out to cool down faster. - - Cover with a damp lint-free kitchen towel. - - Set aside to cool down to room temperature.
- Prepare the dough. - - In a large bowl, combine flour, sugar, salt and yeast well. - - Do not add the yeast directly on the salt. It will kill the yeast. - - Gradually pour the water and cream into the flour mixture while still mixing with a spatula.
- Once it becomes a dough, knead the dough inside the bowl until all the nooks and crannies of flour are kneaded into the dough, about 5 mins. - - Transfer onto a lightly floured surface. - - Add in the yudane.
- Knead for about 5 mins until the yudane is fully incorporated. - - Add in the butter. - - Continue kneading for another 3 to 5 mins. - - Do take note that the yukane and butter has to be at room temperature.
- The dough should be tacky, fluffy, smooth and it should pass the "window-pane" test. - - If the dough is too dry, add in water, 1 TBSP at a time. If the dough is too sticky, add in flour, 1 TBSP at a time. - - Lightly grease the bowl with some butter.
- Transfer the dough back to the greased bowl. - - Cover with a damp lint-free kitchen towel and let rise for 30 mins. - - It should slightly risen. - - Punch down the dough and fold the top, sides and bottom to the center. - - Flip, cover and let rise for 1 hr.
- This process is sorta to ensure that the yeast is activated. - - The dough should doubled in size. - - You can do a test by poking a floured finger into the dough. If it doesn't spring back, the yeast is activated properly and the dough is ready. - - Transfer the dough onto a lightly floured surface. - - Divide the dough into 2 equal pieces.
- Form each piece into balls. - - Cover with a lint-free kitchen towel and let rest for 15 mins. This is call the bench rest which allows the gluten to relax. - - Grease bread pan with butter.
- Pat down a dough ball to an oblong disc. - - Fold the top 2/3 way to the bottom. - - Using the heel of your palm, gently press down the sim.
- Fold the bottom 2/3 way to the top. - - Using the heel of your palm, gently press down the sim. - - Rotate 90 degrees.
- Fold the top 2/3 way to the bottom. - - Gently pinch down the sim. - - Fold the bottom 2/3 way to the top.
- Gently pinch the sim. - - Roll the dough simmed side down to form a ball.
- Transfer into the greased bread pan. - - Repeat the process for the remaining dough. - - You will have 2 dough balls, side by side in your loaf pan. - - Cover with a damp lint-free kitchen towel and let rise for 40 to 50 mins.
- Preheat oven to 200 degree celsius or 400 fahrenheit. - - The dough balls should rise about 1/2 inch away to the top of the loaf pan. - - Close the lid and wack into the oven.
- Bake for 40 to 1 hr or until the crust is golden brown. - - Remove from oven. - - Immediately unmold onto a wire cooling rack.
- Set aside to cool down completely before slicing. - - Use this sandwich bread for your sandwich adventures, or simply make a toast. I just simply spread my gianduja.
I keep mine in the fridge, and I feed it roughly once a week. When I want to make a loaf of bread, I take it out a few days ahead and feed it once a day to. Want to make your favorite yeast bread and rolls reliably soft and tender? You love your grandma's homemade sandwich bread recipe, but wish it was just a bit more tender and less crumbly. You've found a recipe online for cinnamon rolls but are bummed at how quickly they harden up and become.
So that is going to wrap this up for this special food how to make shokupan | japanese sandwich bread recipe. Thank you very much for your time. I am confident that you will make this at home. There is gonna be interesting food at home recipes coming up. Remember to save this page in your browser, and share it to your family, friends and colleague. Thank you for reading. Go on get cooking!